
Introduction
The appspec.yml file will look like below :-
1. Github ( You will have to create a Github account)
2. IAM- Roles and Trust Relationship
3. AWS CodeDeploy
4. AWS CodePipeline
5. EC2-Instance with CodeDeploy-Agent.
In this tutorial I assume that you have created the github account.
1. Configure the IAM Roles. We have to create TWO roles.
First Role :- CodeDeployServiceRole

Select AWS Service --> CodeDeploy --> CodeDeploy
By Default Awscodedeploy policy will be there nothing to edit.

Select Next Permissions

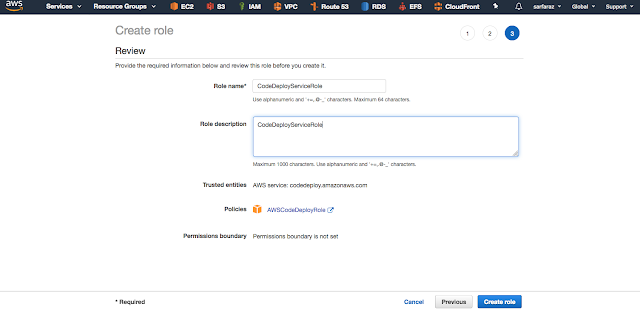
Give the name to Role as given above.
Second Role :- EC2InstanceProfilePolicy
Go to Policies and create Policy

Now Select "JSON" and paste the following content in it.
That's it for the Role
2. Launch the EC2 Instance with the role attached.
Launch the AWS AMI-Linux and add the role

Check the service status with the following command.

In this tutorial we will configure the following things to deploy continuous integration and continuous deployment.
Note :- In the root directory of your github project you must have appspec.yml file. so that codedeploy-agent can install the dependencies for your project. Extract the conent of the zip and upload it to your project. Two important thing will be there "Scripts and appspec.yml" file. You can also download the SampleApp_linux zip from aws or the link below :-
wget https://aws-codedeploy-us-west-2.s3.amazonaws.com/samples/latest/SampleApp_Linux.zip
The appspec.yml file will look like below :-
version: 0.0
os: linux
files:
  - source: /index.html
    destination: /var/www/html/
hooks:
  BeforeInstall:
    - location: scripts/install_dependencies
      timeout: 300
      runas: root
    - location: scripts/start_server
      timeout: 300
      runas: root
  ApplicationStop:
    - location: scripts/stop_server
      timeout: 300
runas: root
1. Github ( You will have to create a Github account)
2. IAM- Roles and Trust Relationship
3. AWS CodeDeploy
4. AWS CodePipeline
5. EC2-Instance with CodeDeploy-Agent.
In this tutorial I assume that you have created the github account.
1. Configure the IAM Roles. We have to create TWO roles.
First Role :- CodeDeployServiceRole

Select AWS Service --> CodeDeploy --> CodeDeploy
By Default Awscodedeploy policy will be there nothing to edit.

Select Next Permissions


Give the name to Role as given above.
Second Role :- EC2InstanceProfilePolicy
Go to Policies and create Policy

Now Select "JSON" and paste the following content in it.
{
    "Version": "2012-10-17",
    "Statement": [
      {
          "Action": [
              "s3:Get*",
              "s3:List*"
          ],
          "Effect": "Allow",
          "Resource": "*"
      }
    ]
}
 
Now Create IAM-Role with the policy above created with below steps
Click on Create Role and select EC2 and use case EC2 
Click Next Permission and attach the policy we created in the above step with name :- EC2InstanceProfilePolicy
 Click on Next Review and give name EC2InstanceProfileRole  |
2. Launch the EC2 Instance with the role attached.
Launch the AWS AMI-Linux and add the role

Note :- If you are using Ubuntu or any other OS you have to configure aws programatic access to the instance and also configure the region in which your instance are there.
After you have launched the instance you need to install codedeploy-agent on the instance with the following command.
1. yum update -y
2. yum install -y ruby wget curl git
Download the codedeploy-agent script from the below command. Change the region as per yours it is important
wget https://aws-codedeploy-us-west-2.s3.amazonaws.com/latest/install
chmod +x install
sudo ./install auto
Check the service status with the following command.
sudo service codedeploy-agent status

If you have completed the following now we will configure the second part.
Subscribe by Email
Follow Updates Articles from This Blog via Email
No Comments