Tuesday, 30 October 2018

thumbnail

How-to-configure-AWS-Lambda-Serverless-Image-Processing

Introduction


In this tutorial I will show you how to configure the AWS Lambda for doing serverless image processing using AWS-S3 service.

Things required for configuring :-

1. IAM User
2. S3 Bucket
3. IAM Role
4. Nodejs
5. Lambda Function

1. First create the IAM user and configure it in your system.


Note :- I have provided administrative access. You also need to make sure that the bucket must be created in the same region.

2. Create two Bucket in the same region and upload file called HappyFace.jpg in techs2resolve bucket:-

Note:- You can rename any JPG file to HappyFace.jpg and upload it. or search on google and upload it.

1. techs2resolve <--- Upload HappyFace.jpg in the bucket
2. techs2resolveresized

Bucket name should be in the same order as above for example you created the first bucket:- example, the second bucket name must be :- exampleresized. Change the bucket name as per yours.

3. Install nodejs in your system :- 


For MacOS high Sierra or later
https://nodejs.org/dist/v10.13.0/node-v10.13.0.pkg

For Ubuntu and linux
sudo apt-get install curl python-software-properties
curl -sL https://deb.nodesource.com/setup_10.x | sudo -E bash -
sudo apt-get install nodejs -y
 
4. Open terminal and create a folder called techs2resolve-lambda-test or whatever you like in your system:-


mkdir techs2resolve-lambda-test
cd techs2resolve_lambda_test 

a) Create a file inside techs2resolve-lambda-test called index.js and paste the below code:-

// dependencies
var async = require('async');
var AWS = require('aws-sdk');
var gm = require('gm')
            .subClass({ imageMagick: true }); // Enable ImageMagick integration.
var util = require('util');

// constants
var MAX_WIDTH  = 100;
var MAX_HEIGHT = 100;

// get reference to S3 client 
var s3 = new AWS.S3();
 
exports.handler = function(event, context, callback) {
    // Read options from the event.
    console.log("Reading options from event:\n", util.inspect(event, {depth: 5}));
    var srcBucket = event.Records[0].s3.bucket.name;
    // Object key may have spaces or unicode non-ASCII characters.
    var srcKey    =
    decodeURIComponent(event.Records[0].s3.object.key.replace(/\+/g, " "));  
    var dstBucket = srcBucket + "resized";
    var dstKey    = "resized-" + srcKey;

    // Sanity check: validate that source and destination are different buckets.
    if (srcBucket == dstBucket) {
        callback("Source and destination buckets are the same.");
        return;
    }

    // Infer the image type.
    var typeMatch = srcKey.match(/\.([^.]*)$/);
    if (!typeMatch) {
        callback("Could not determine the image type.");
        return;
    }
    var imageType = typeMatch[1];
    if (imageType != "jpg" && imageType != "png") {
        callback('Unsupported image type: ${imageType}');
        return;
    }

    // Download the image from S3, transform, and upload to a different S3 bucket.
    async.waterfall([
        function download(next) {
            // Download the image from S3 into a buffer.
            s3.getObject({
                    Bucket: srcBucket,
                    Key: srcKey
                },
                next);
            },
        function transform(response, next) {
            gm(response.Body).size(function(err, size) {
                // Infer the scaling factor to avoid stretching the image unnaturally.
                var scalingFactor = Math.min(
                    MAX_WIDTH / size.width,
                    MAX_HEIGHT / size.height
                );
                var width  = scalingFactor * size.width;
                var height = scalingFactor * size.height;

                // Transform the image buffer in memory.
                this.resize(width, height)
                    .toBuffer(imageType, function(err, buffer) {
                        if (err) {
                            next(err);
                        } else {
                            next(null, response.ContentType, buffer);
                        }
                    });
            });
        },
        function upload(contentType, data, next) {
            // Stream the transformed image to a different S3 bucket.
            s3.putObject({
                    Bucket: dstBucket,
                    Key: dstKey,
                    Body: data,
                    ContentType: contentType
                },
                next);
            }
        ], function (err) {
            if (err) {
                console.error(
                    'Unable to resize ' + srcBucket + '/' + srcKey +
                    ' and upload to ' + dstBucket + '/' + dstKey +
                    ' due to an error: ' + err
                );
            } else {
                console.log(
                    'Successfully resized ' + srcBucket + '/' + srcKey +
                    ' and uploaded to ' + dstBucket + '/' + dstKey
                );
            }

            callback(null, "message");
        }
    );
};

b) Create a folder inside a directory techs2resolve-lambda-test called node_modules:-

cd techs2resolve_lambda_test 
mkdir node_modules

c) The AWS Lambda runtime already has the AWS SDK for JavaScript in Node.js, so you only need to install the other libraries. Open a command prompt, navigate to the techs2resolve-lambda-test, and install the libraries using the npm command, which is part of Node.js.

cd techs2resolve_lambda_test 
npm install async gm

5. Zip the index.js file and node_modules folder as CreateThumbnail.zip :- 

zip -r CreateThumbnail.zip index.js node_modules

6. Create a IAM role :-


To create an execution role

    Open the roles page in the IAM console.

    Choose Create role.

    Create a role with the following properties.

        Service – AWS Lambda.

        Permissions – AWSLambdaExecute.

        Role name – lambda-s3-role.
The AWSLambdaExecute policy has the permissions that the function needs to manage objects in Amazon S3 and write logs to CloudWatch Logs


7. Create the function with the aws cli command :-

Note :- You will have to get arn from the IAM role which you created. In the above screentshot Role ARN is mentioned.

cd techs2resolve_lambda_test  
aws lambda create-function --function-name CreateThumbnail \
--zip-file fileb://CreateThumbnail.zip --handler index.handler --runtime nodejs8.10 \
--role  arn:aws:iam::221794368523:role/lambda-s3-role \
--timeout 30 --memory-size 1024

8. Create a file called inputfile.txt and paste the below content :-
Change the bucket name as per your highlighted in red


vim inputfile.txt

{
   "Records":[
      {
         "eventVersion":"2.0",
         "eventSource":"aws:s3",
         "awsRegion":"us-west-2",
         "eventTime":"1970-01-01T00:00:00.000Z",
         "eventName":"ObjectCreated:Put",
         "userIdentity":{
            "principalId":"AIDAJDPLRKLG7UEXAMPLE"
         },
         "requestParameters":{
            "sourceIPAddress":"127.0.0.1"
         },
         "responseElements":{
            "x-amz-request-id":"C3D13FE58DE4C810",
            "x-amz-id-2":"FMyUVURIY8/IgAtTv8xRjskZQpcIZ9KG4V5Wp6S7S/JRWeUWerMUE5JgHvANOjpD"
         },
         "s3":{
            "s3SchemaVersion":"1.0",
            "configurationId":"testConfigRule",
            "bucket":{
               "name":"techs2resolve",
               "ownerIdentity":{
                  "principalId":"A3NL1KOZZKExample"
               },
               "arn":"arn:aws:s3:::techs2resolve"
            },
            "object":{
               "key":"HappyFace.jpg",
               "size":1024,
               "eTag":"d41d8cd98f00b204e9800998ecf8427e",
               "versionId":"096fKKXTRTtl3on89fVO.nfljtsv6qko"
            }
         }
      }
   ]
}


9. Run the following Lambda CLI invoke command to invoke the function. Note that the command requests asynchronous execution. You can optionally invoke it synchronously by specifying RequestResponse as the invocation-type parameter value.

aws lambda invoke --function-name CreateThumbnail --invocation-type Event \
> --payload file://inputfile.txt outputfile.txt
 
At this point your image is converted with the above command placed inside techs2resolveresized bucket.

10. Now configure the trigger in S3 bucket "techs2resolve" to automate this process :-

Go to service open and S3 and select techs2resolve bucket.


Go to properties and select Event

 Configure like below in the screenshot 


11. Upload the images in "techs2resolve" bucket and it will automatically resize with the help of lambda function.


As you can see in the above image we have resized images.

I have find the reference on AWS link :- AWS-S3-LAMBDA-SERVERLESS 

That's it enjoy using it,
Please do Comments, Like and share.


Monday, 29 October 2018

thumbnail

How to configure AWS CodeDeploy and Codepipeline with Github(Part-3)

Introduction

In this tutorial we will configure AWS-CodePipeline for Continuous Deployment. In the previous article I have written about configuring aws-codedeploy service. For this to work you need to configure both previous tutorial. Please check the link below:-

1. How-to-configure-aws-codedeploy-and-Codepipeline-Part-1
2. How-to-configure-aws-codedeploy-and_Codepipeline-Part-2 

1. Now lets configure AWS-Codepipeline service :-

Give the name to the pipeline :-


Provide the Source :- Github and connect the repository


Build Provider :- No Build - as we dont want to build for demo

 
Next Deployment method :- AWS-CodeDeploy

 
Provide the service role. If you do not have role created previously then click on create role and just allow it. You will have name something like this "AWS-CodePipeline-Service" select it.

 
Lastly review the pipeline and click on create pipeline :-

 
Once the process is completed you will have successful message displayed in stages. It will take time if your code is big.


This means you have successfully deployed continuous integration and continuous deployment on your environment. Now whenever you push the changes in your github project the changes will be automatically deployed on your server.

That's it 
Please do Like,Comments and Share.
thumbnail

How to configure AWS CodeDeploy and Codepipeline with Github(Part-2)

Introduction

In this tutorial we will configure the AWS-Codedeploy service and AWS-CodePipeline service to make Continuous integration and Continuous deployment work.

If you are new user first configure the Part-1 as per the previous article. Click the link below :-
how-to-configure-aws-codedeploy-and-codepipeline-with-github

1. Lets configure the aws-codedeploy service :-

Configure the following as below :-


Application name - techs2resolve2git
Compute Platform - EC2/On-premises
Deployment group name - techs2resolve2git  

 Also select In-Place Deployment as it is our requirement.


Configure the Environment and select our instance in which we have install codedeploy-agent. As we are deploying on a single instance we have to select EC2-Instance with tag like below :-


And also we are not using any load balancer for this demo so we are not selecting load balancer leave it as it is.

Deployment Configuration will be :- OneAtAtime


Select the service role we created in part-1 with name:- CodeDeployServiceRole

Click on Create application.


Your application is created successfully.

For testing purpose we will deploy the application manually test here.

1. Select the Application and click Action button and select deploy new revision :-


Application name and Deployment group will be selected automatically or you can select it. Select the option Github to connect with Github repository.


After you have selected github you will have to connect to authorize the github for aws and provide repository name and commit id. 


Leave other as it is and Click on Deploy 


Once the installation is complete you will see the success message.


Lets browse with IP to check installation.


We will next configure the AWS-CodePipeline service in (Part-3)
Check the Part-3

thumbnail

How to configure AWS CodeDeploy and Codepipeline with Github(Part-1)

Introduction

In this tutorial we will configure the following things to deploy continuous integration and continuous deployment.

Note :- In the root directory of your github project you must have appspec.yml file. so that codedeploy-agent can install the dependencies  for your project. Extract the conent of the zip and upload it to your project. Two important thing will be there "Scripts and appspec.yml" file. You can also download the SampleApp_linux zip from aws or the link below :-

wget https://aws-codedeploy-us-west-2.s3.amazonaws.com/samples/latest/SampleApp_Linux.zip

 The appspec.yml file will look like below :-


version: 0.0
os: linux
files:
  - source: /index.html
    destination: /var/www/html/
hooks:
  BeforeInstall:
    - location: scripts/install_dependencies
      timeout: 300
      runas: root
    - location: scripts/start_server
      timeout: 300
      runas: root
  ApplicationStop:
    - location: scripts/stop_server
      timeout: 300
runas: root
 
1. Github ( You will have to create a Github account)
2. IAM- Roles and Trust Relationship
3. AWS CodeDeploy 
4. AWS CodePipeline
5. EC2-Instance with CodeDeploy-Agent.

In this tutorial I assume that you have created the github account. 

1. Configure the IAM Roles. We have to create TWO roles. 

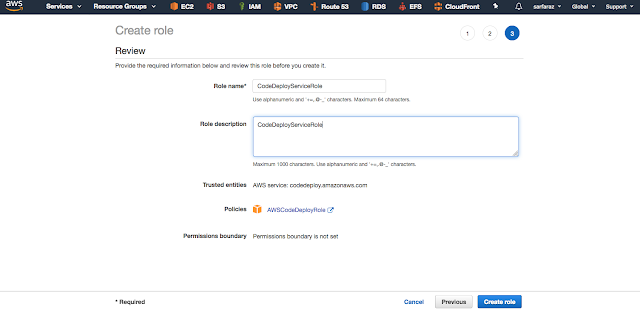
First Role :- CodeDeployServiceRole 


Select AWS Service --> CodeDeploy --> CodeDeploy 
By Default Awscodedeploy policy will be there nothing to edit.


Select Next Permissions


Give the name to Role as given above.

Second Role :- EC2InstanceProfilePolicy

Go to Policies and create Policy


 Now Select "JSON" and paste the following content in it.

{ 
    "Version": "2012-10-17", 
    "Statement": [   
      {     
          "Action": [       
              "s3:Get*",       
              "s3:List*"     
          ],     
          "Effect": "Allow",     
          "Resource": "*"   
      } 
    ]
}


Click on Review Policy and Give the name to the policy and create


Now Create IAM-Role with the policy above created with below steps
Click on Create Role and select EC2 and use case EC2


Click Next Permission and attach the policy we created in the above step with name :-  EC2InstanceProfilePolicy


 Click on Next Review and give name EC2InstanceProfileRole

That's it for the Role

2. Launch the EC2 Instance with the role attached.

Launch the AWS AMI-Linux and add the role

Note :- If you are using Ubuntu or any other OS you have to configure aws programatic access to the instance and also configure the region in which your instance are there.

After you have launched the instance you need to install codedeploy-agent on the instance with the following command.


1. yum update -y 
2. yum install -y ruby wget curl git

Download the codedeploy-agent script from the below command. Change the region as per yours it is important


wget https://aws-codedeploy-us-west-2.s3.amazonaws.com/latest/install
chmod +x install
sudo ./install auto

Check the service status with the following command.

sudo service codedeploy-agent status


If you have completed the following now we will configure the second part.

Wednesday, 21 February 2018

thumbnail

Mysql database creation for Remotely accessing database

Introduction

In this tutorial we are going to see how to create mysql database for local use and how to configure it for remotely accessing the database.

For this tutorial I have taken AWS-EC2 Instance and configured the security group to allow the inbound connection for mysql database from remote IP.

You can add the particular IP or allow everyone to connect to it. But for the security reason you should allow only specific IP from where you want to access database.

I have taken Ubuntu EC2 instance for this demo. You can take of your choice.

1. First of all update and upgrade your Instance like below :- 

sudo apt-get update
sudo apt-get upgrade

2. Install the mysql-server on your instance :-

sudo apt-get install mysql-server -y

3. Configure the mysqld.cnf like below :-

Change the bind address from 127.0.0.1 to 0.0.0.0 like below 

cd /etc/mysql/mysql.conf.d/
vim mysqld.cnf

bind-address = 0.0.0.0

save and exit the file 

4. Restart the mysql service to take effect :-

sudo service mysql restart

5. Create the database for remotely accessing the database :-

The only difference is you will have to keep in mind that you have to assign remote location ip from where you will access the database. 

CREATE DATABASE testing1;
CREATE USER 'testing1'@'20.13.11.10' IDENTIFIED BY 'testing1';
GRANT ALL PRIVILEGES ON testing1.* TO 'testing1'@'20.13.11.10';
FLUSH PRIVILEGES;

For locally accessing the database you can define localhost instead of IP address. 

To allow anyone create database like below :-

CREATE DATABASE wordpress;
CREATE USER 'wordpress'@'%' IDENTIFIED BY 'wordpress';
GRANT ALL PRIVILEGES ON wordpress.* TO 'wordpress'@'%';
FLUSH PRIVILEGES;

Here % mean anyone can connect to database.

That's it guys
Please do Comments, Likes and Share.   

Wednesday, 17 January 2018

thumbnail

How to configure virtualhost in Nginx on Ubuntu-16.04

Introduction


In this tutorial we are going to see  how to configure virtualhost in Nginx on Ubuntu-16.04 server. For the demo purpose I have taken AWS-EC2 instance. I have successfully installed LEMP server.

To install LEMP server you can click on below link 
http://www.techs2resolve.in/2018/01/how-to-install-and-configure-lemp-in.html

After you have installed LEMP follow the below step to configure.

Note:- Please make sure that you replace the domain name with your own like my :- test.techs2resolve.in. Also create A record in Domain DNS which points to your servers Public IP.

For testing purpose you can add host entry in your local systems host file  /etc/hosts like below:- 
192.168.1.10     test.techs2resolve.in

1. Copy the default configuration file with your domain name :-

sudo cp -av /etc/nginx/sites-available/default /etc/nginx/sites-available/test.techs2resolve.in


2. Now edit your conf file  like below :-

sudo vim /etc/nginx/sites-available/test.techs2resolve.in

3. You have to make 3 changes in conf file like below :-

1.  Remove default_server parameter from line no 17
2.  Change the Document Root path with your folder on line no 36
3.  Change the server_name with your domain name on line 41

The file will look like below :-


4.  Create the directory for your data to be stored :-

sudo mkdir /var/www/html/test.techs2resolve.in

5. Create a index.php file inside your Document Root Directory :-

sudo vim /var/www/html/test.techs2resolve.in/index.php

Enter the below code in file :-

<?php 
phpinfo();
?>


6. Now enable the site so that we can check :-

cd /etc/nginx/sites-enabled/
sudo ln -s /etc/nginx/sites-available/test.techs2resolve.in .

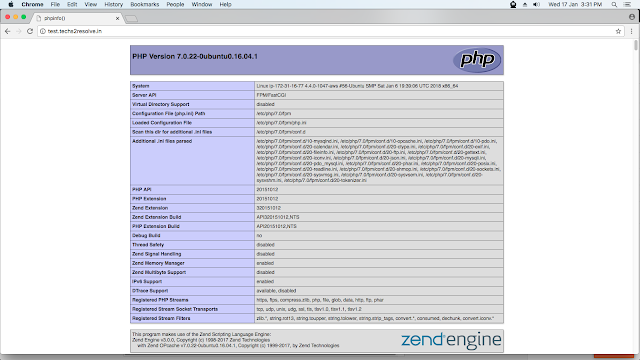
7. Now test in browser :-


That's it
Please do Comments, Likes and Share

Tuesday, 16 January 2018

thumbnail

How to install and configure LEMP in ubuntu-16.04

Introduction


LEMP stands for Linux ,Nginx, Mysql and PHP. The word LEMP describes that Linux operating system, with an Nginx web server. The backend data will be stored Mysql database and the dynamic data will be processed by PHP.


In this tutorial we will see how to install and configure LEMP on AWS EC2 instance. I have taken new AWS-EC2 instance.

Note :- Update and upgrade your server first.

1. First of all install Nginx web server :-

sudo apt-get update && sudo apt-get upgrade -y
sudo apt-get install nginx


2. Now we will install Mysql database server :-

sudo apt-get install mysql-server -y


It will ask you for the password during the installation so enter the strong password of your choice and make note of it.


As you can see in the above image we have successfully installed Mysql database server and created the test database.

3. We need to install PHP now :-

We now have Nginx installed to serve our pages and MySQL installed to store and manage our data. However, we still don't have anything that can generate dynamic content. We can use PHP for this.

Since Nginx does not contain native PHP processing like some other web servers, we will need to install php-fpm, which stands for "fastCGI process manager". We will tell Nginx to pass PHP requests to this software for processing.

We can install this module and will also grab an additional helper package that will allow PHP to communicate with our database backend. The installation will pull in the necessary PHP core files. Do this by typing:-

sudo apt-get install php-fpm php-mysql -y


Configure the PHP processor. 

We have php-fpm component installed. we have to configure it in the below file so that our nginx web server will be able to process it.

sudo vim /etc/php/7.0/fpm/php.ini

Find the text :- cgi.fix_pathinfo=1 and uncomment it and change it "0" zero. 


Restart php-fpm service to take effect.

sudo systemctl restart php7.0-fpm

4. Configure the Nginx to use PHP-Processor.

sudo vim /etc/nginx/sites-available/default

First, we need to add index.php as the first value of our index directive so that files named index.php are served, if available, when a directory is requested. 

We can modify the server_name directive to point to our server's domain name or public IP address.

For the actual PHP processing, we just need to uncomment a segment of the file that handles PHP requests by removing the pound symbols (#) from in front of each line. This will be the location ~\.php$ location block, the included fastcgi-php.conf snippet, and the socket associated with php-fpm.

We will also uncomment the location block dealing with .htaccess files using the same method. Nginx doesn't process these files. If any of these files happen to find their way into the document root, they should not be served to visitors. 

server {
    listen 80 default_server;
    listen [::]:80 default_server;

    root /var/www/html;
    index index.php index.html index.htm index.nginx-debian.html;

    server_name 54.202.16.3;

    location / {
        try_files $uri $uri/ =404;
    }

    location ~ \.php$ {
        include snippets/fastcgi-php.conf;
        fastcgi_pass unix:/run/php/php7.0-fpm.sock;
    }

    location ~ /\.ht {
        deny all;
    }
}

Restart the nginx service to check 

sudo service nginx restart
 
Create the info.php file in /var/www/html with root user and check in the web browser.

 
As you can see in the above image we have successfully installed the LEMP server.

Please do Comments, Like and Share.